The moment your idea moves toward production, the technical questions begin. You have to define box dimensions, materials, CMYK colors, bleed areas, resolution, dielines, and printing methods. For a brand doing packaging design for the first time, these details are often harder than the design itself.
We see this all the time. Brands come to us with AI generated designs that look impressive. Then they ask, “Can you print this?” The honest answer is usually, “Almost. But first we need to turn it into a file the machines can read.”
This guide shows you how to do exactly that. You’ll learn how to take a packaging idea—the journey from ai packaging ideas to production—and turn it into production ready packaging that a manufacturer can quote, prototype, and produce.
Why AI Packaging Design Concepts Are Easy to Create but Difficult to Manufacture
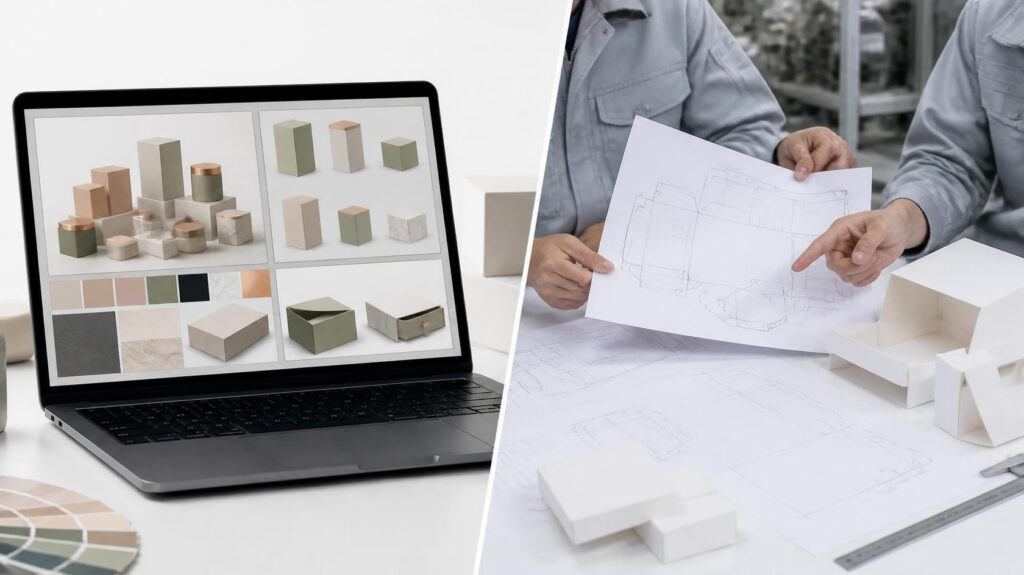
AI packaging design is good at the creative part. Give it a prompt, and it hands back visual inspiration, style directions, color ideas, and branding elements. Generative AI tools do this faster than any human designer.
AI tools are excellent for generating packaging ideas, mood boards, visual styles, and product packaging concepts. But there is a limit: AI creates a visual concept, not a manufacturing specification. It rarely thinks about how the box is built. And that gap shows up in three places.
Structural requirements
AI will show you a beautiful magnetic closure box. But it won’t tell you the panel size, the folding structure, or where the magnets sit inside the board.
A render shows the outside. Manufacturing needs the inside. You need to know how every panel folds, locks, and holds the product without collapsing. This is where structural integrity, box style, and packaging structure become important.
Printing limitations
On screen, AI design can generate endless smooth gradients and glowing colors. Print doesn’t work that way.
Printing runs on CMYK ink, not backlit RGB pixels. Some colors your screen shows can’t be reproduced with ink. Heavy gradients also shift once they’re converted for the press.
Material reality
An AI image may show premium textured paper or a luxury rigid box, but the final packaging still needs a clear material specification. Common packaging materials include kraft paper, coated paper, rigid board, and corrugated board. The material affects the package’s appearance, durability, structure, and cost.
How to Use AI for Packaging Design Before Production
AI works best as a starting point in the packaging design process. You can use AI tools to explore packaging concepts, generate visual directions, compare color palettes, and communicate an initial idea to your design team or packaging manufacturer.
However, an AI-generated packaging concept should be treated as a visual reference rather than final production artwork. Before manufacturing, the concept needs to be translated into real packaging specifications, including the box structure, dimensions, materials, dieline, color settings, and print requirements.
This makes AI most useful at the concept stage: it helps brands explore more packaging ideas quickly, while designers and packaging manufacturers handle the technical steps required for production.
The Key Differences Between a Packaging Mockup and a Production-Ready Design
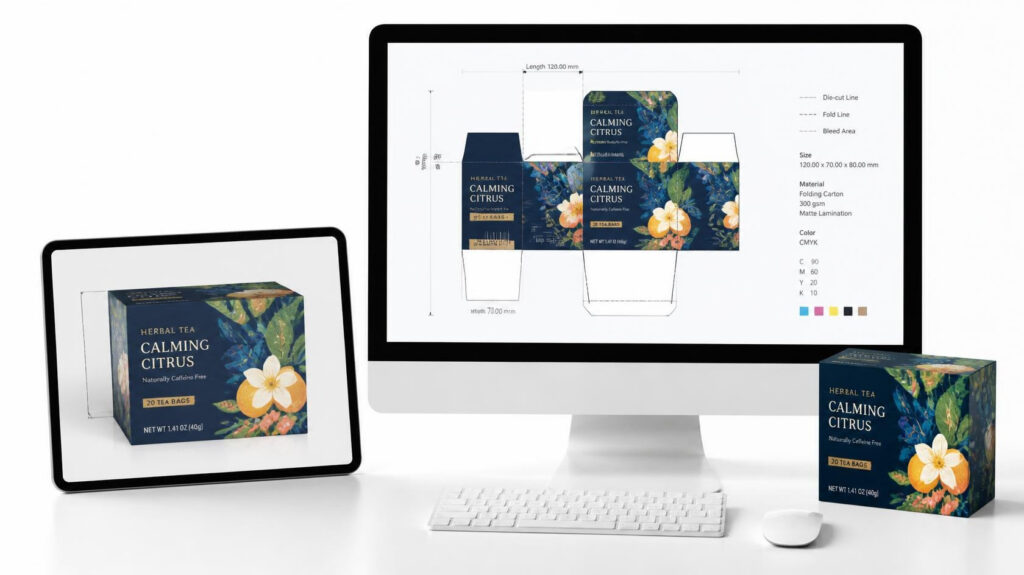
A mockup and a production file serve different purposes. A mockup shows how the packaging should look; a production file tells the manufacturer how to make it.
An AI mockup is useful for presenting a concept or approving a visual direction. However, it usually does not contain accurate dimensions, a dieline, bleed, material specifications, or print-ready artwork.
A production-ready file is different. It tells the factory exactly how to build the box. It holds the real measurements, the fold lines, the color specs, and the print-ready artwork.
Here’s a side-by-side comparison to make the difference clear:
Element | AI Mockup | Production-Ready Design |
Purpose | Visual inspiration & approval | Actual manufacturing |
Dimensions | Approximate or visual | Exact L × W × H |
Color mode | Usually RGB | CMYK or specified spot colors |
Dieline | Not included | Required (cut, fold, bleed lines) |
Bleed & safety margin | Usually not defined | Defined (usually 3mm bleed) |
Resolution | Low / screen-based | 300 DPI print resolution |
Material | Visual representation | Real material specification |
File format | JPG / PNG | AI / PDF / vector |
Can a factory quote it? | No | Yes |
The takeaway is simple. An AI mockup answers, “How does it look?” A production file answers, “How do we build it, and what will it cost?”
Before you ask a manufacturer for a quote, you need to move from the first question to the second. Everything below shows you how to do that—one technical element at a time.
What Makes a Packaging Design “Production-Ready”
“Production-ready” isn’t a vague quality. It’s a checklist. A file is ready for manufacturing when it answers every question the factory needs to build your box correctly, with no guessing.
Let’s go through the elements that matter most. We’ll start with the two that cause the most problems: dimensions and brand colors.
Packaging Dimensions
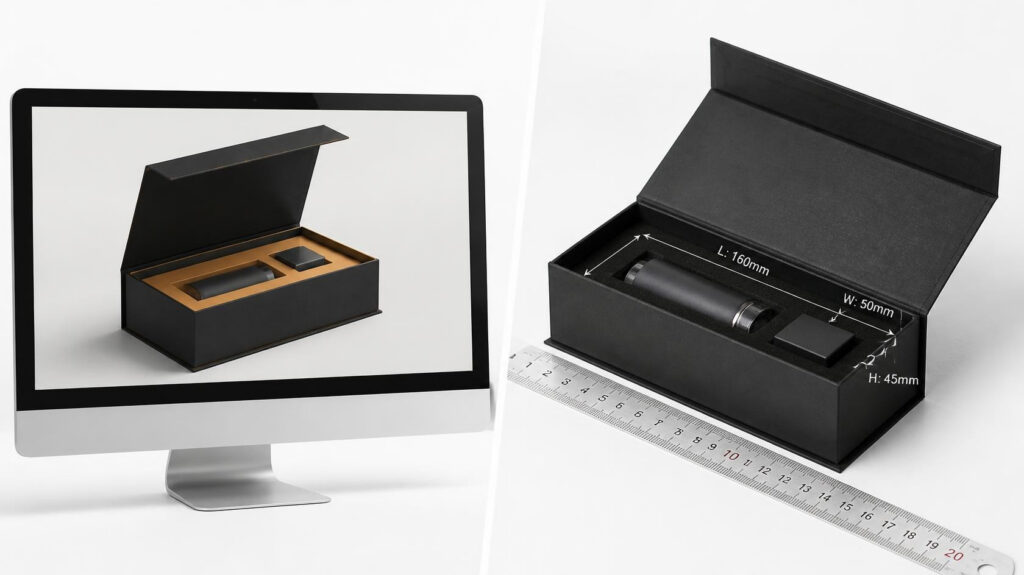
Packaging dimensions are one of the first things to verify. An AI render may look well-proportioned, but visual proportions do not guarantee that the package will fit the product.
Every custom box needs three dimensions: length, width, and height (L × W × H). Start with the product’s actual dimensions, then account for inserts, padding, and the required internal clearance when defining the box dimensions.
Get this wrong, and one of two things happens. The product doesn’t fit, or it rattles around inside a box that’s too big. Both look unprofessional. And both cost money to fix.
Packoi Expert Tip: Check dimensions before prototyping
One common issue we see is a box that looks right in an AI render but does not fit the actual product. We confirm the product dimensions, internal L × W × H, and insert requirements before prototyping. This simple check can prevent costly revisions later.
Not sure how to measure correctly? Our team can help you confirm the right internal dimensions based on your product. Share the item specs, and we’ll work backward from there.
CMYK vs RGB
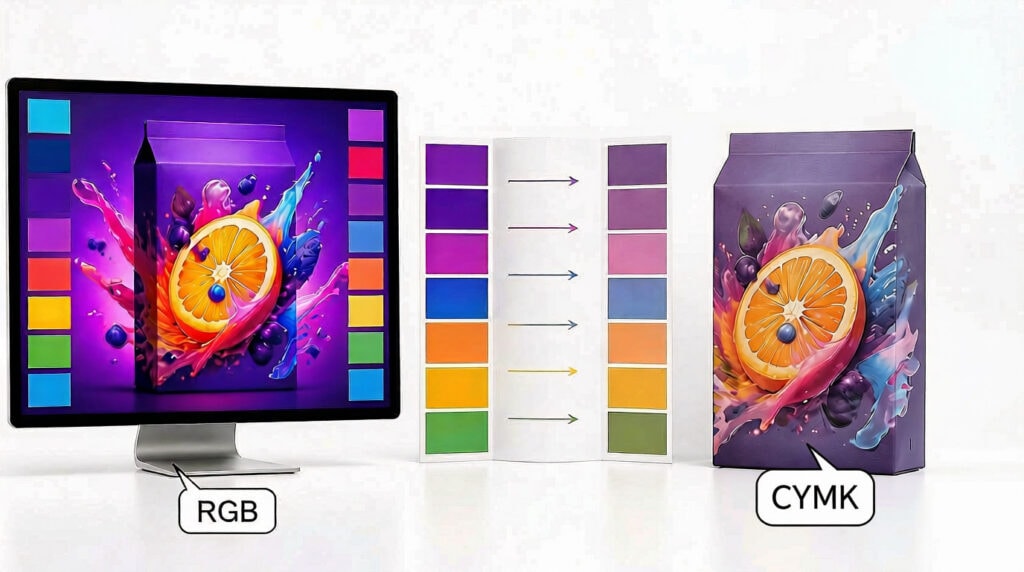
AI-generated packaging concepts are typically created in RGB for screen display, while commercial printing uses CMYK or specified spot colors. This difference can cause noticeable color shifts when a concept moves from screen to print.
Some bright and highly saturated RGB colors cannot be reproduced exactly with CMYK inks. Converting and checking the artwork before production gives you more control over the final printed color.
For important brand colors, a Pantone spot-color reference can provide a more consistent production target than relying only on screen color or CMYK conversion.
Packoi Expert Tip: Why your printed color may not match your screen
The most common surprise for first-time buyers is color shift. A vivid AI render in RGB almost always prints darker or less saturated in CMYK, because ink can’t emit light the way a screen does. We convert every file to CMYK and flag any colors that fall outside the printable range before production. For critical brand assets, we recommend locking them to a Pantone reference so they stay consistent across every reprint.
Bleed & Safety Margin
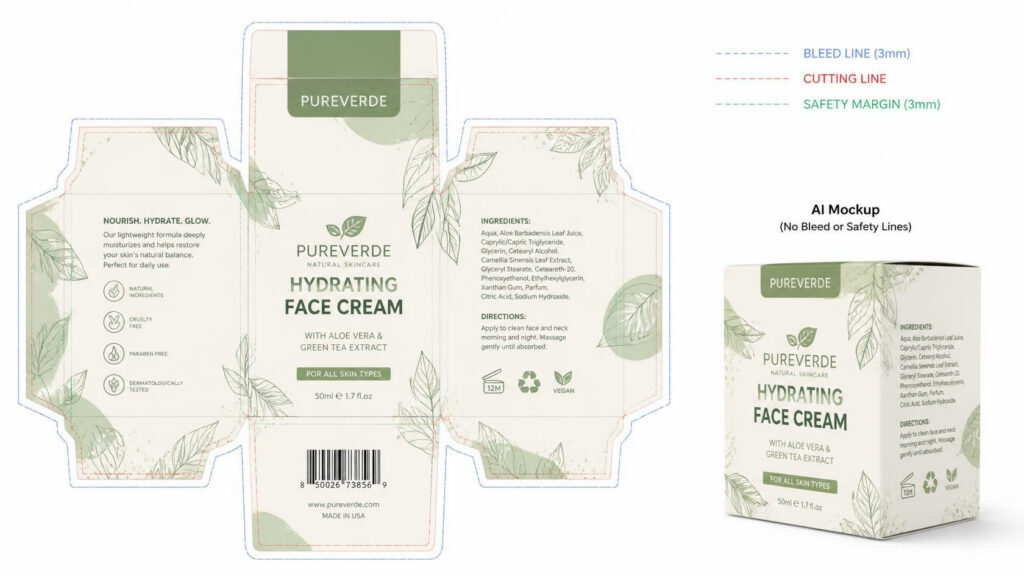
Even a well-sized, well-colored design can fail because of one thing. Most first-time buyers have never heard of it: bleed.
Bleed is the extra artwork that extends beyond the final cut line. It allows for minor cutting variation and helps prevent unwanted white edges on the finished package.
The industry standard is usually 3mm of bleed on every edge.
The safety margin is the protected area inside the cut line. Keep important elements such as logos, text, and barcodes inside it to reduce the risk of trimming or folding issues.
The rule is simple. Background artwork extends past the cut line (bleed). Important content stays well inside it (safety margin).
An AI mockup has neither of these. Adding them is a core part of preparing a file for print.
Resolution / DPI
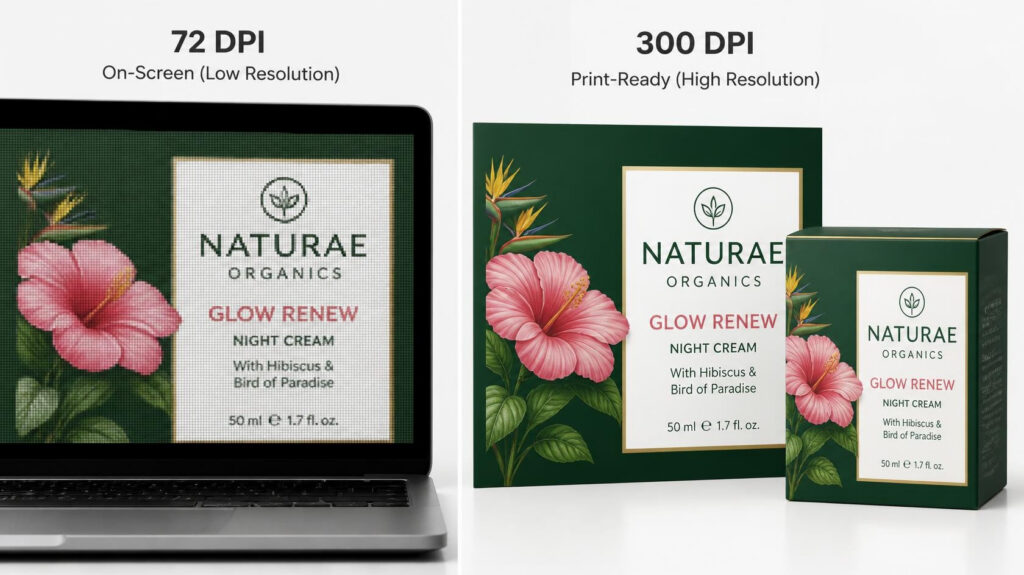
Resolution affects how sharp your printed packaging looks. For raster artwork, 300 DPI at the final print size is a common production standard.
The standard for print is 300 DPI (dots per inch) at the final print size.
AI-generated images may not contain enough resolution for large-format packaging artwork, especially when enlarged significantly. Blown up onto a physical box, they turn soft, pixelated, or fuzzy—especially small text and fine lines.
The safest fix is to rebuild key elements as vector graphics. This includes logos, text, and icons. Vectors scale to any size without losing sharpness. That’s why factories prefer vector artwork for print.
Dieline
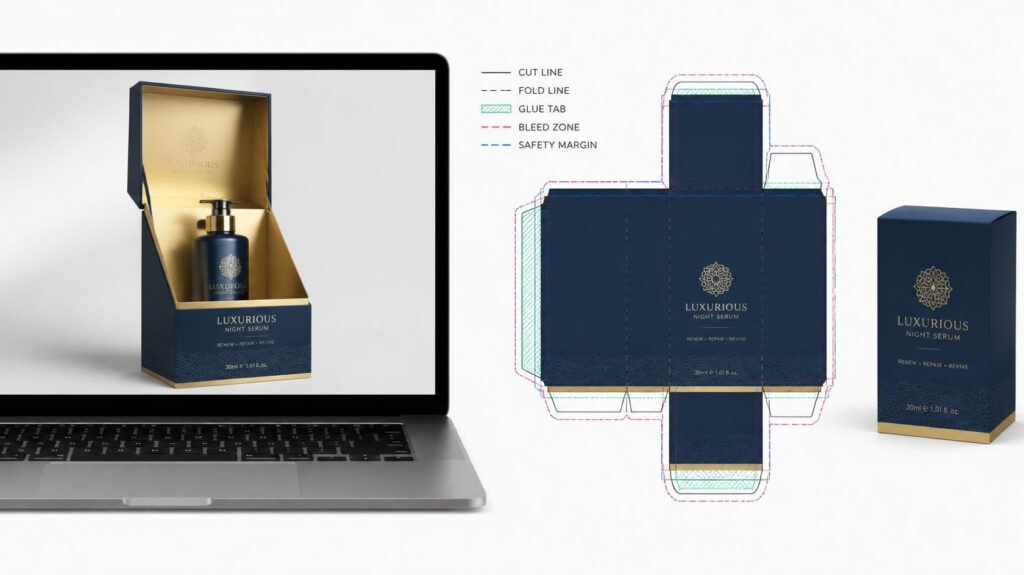
If one element separates a “pretty picture” from a “real packaging file,” it’s the dieline.
A dieline is the flat, unfolded blueprint of your box. It maps out every cut line, fold line, glue tab, and bleed area. Everything is laid out flat, exactly as the material looks before it’s assembled.
Think of it as the architectural drawing of your packaging. The factory doesn’t build from your render. It builds from the dieline. Your artwork is then placed onto the dieline, so every graphic lands on the correct panel.
Without a dieline, there’s no way to know where the front panel ends and the side panel begins. You can’t tell where the box folds or where the glue flaps go. This is why AI mockups can’t go straight to production—no matter how good they look. Turning them into production ready dielines is a key step.
Packoi Expert Tip: Check artwork on the dieline before production
Artwork can look correct in a flat layout but become misaligned after folding. We check logos, text, and key graphics against the dieline before prototyping to catch fold-line and panel-placement issues early.
Don’t have a dieline? Don’t worry. A manufacturer creates it for you, based on your box style and dimensions. Share your box type and measurements, and our team can generate a correct dieline for your design to sit on.
File Formats
The final file format must preserve the artwork, colors, dimensions, and dieline needed for production.
Here’s the short version:
- JPG / PNG — Suitable for concepts, previews, and visual references, but generally not sufficient as final packaging artwork.
- Print-ready PDF — Commonly used for final artwork because it can preserve vector graphics, CMYK or spot colors, fonts, bleed, and other production specifications.
- AI / vector files — Useful for editable working artwork and scalable graphics such as logos, text, and icons.
Use JPG or PNG for visual references; use a print-ready PDF or appropriate vector artwork for production.
Not sure if your file is print-ready? Send it over. We’ll check the color mode, resolution, bleed, and dieline before quoting. That way, there are no surprises later.
How to Choose the Right Printing Method
Once your file is print ready, one big question remains. Which printing method should produce it? This choice affects your cost, your minimum order quantity, and even which finishes are possible.
There are three common methods. The right one usually comes down to your order quantity.
Digital Printing
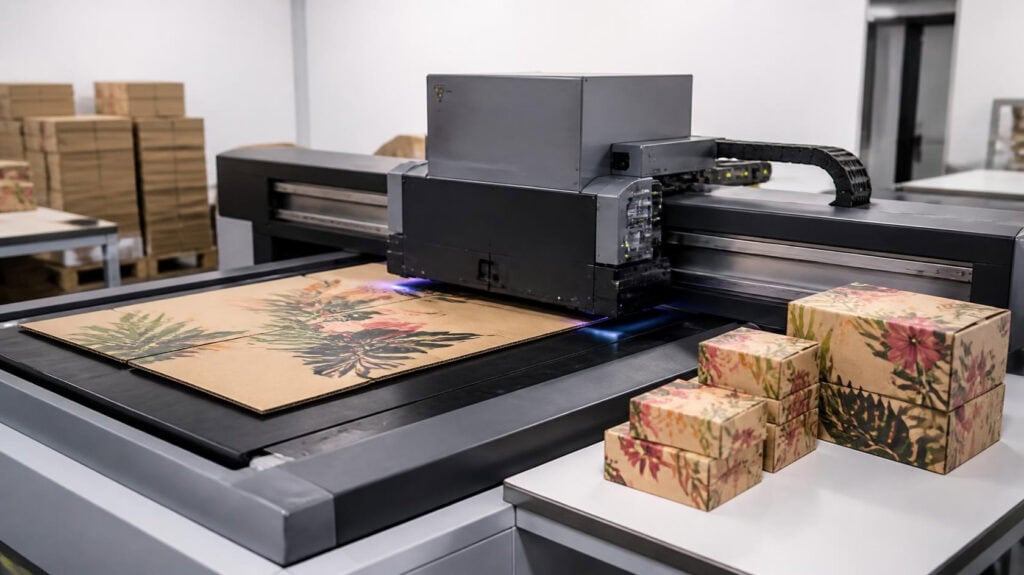
Digital printing produces artwork directly from a digital file without traditional printing plates. It is well suited to prototypes, samples, short runs, and product testing. The main trade-off is a higher unit cost at larger volumes.
Best for: startups, first orders, limited editions, product testing.
Offset Printing
Offset printing uses plates and is well suited to medium and large production runs. It offers consistent color and detailed print quality, while the unit cost becomes more competitive as volume increases.
Best for: medium-to-large runs, retail packaging, premium color accuracy.
Flexographic (Flexo) Printing
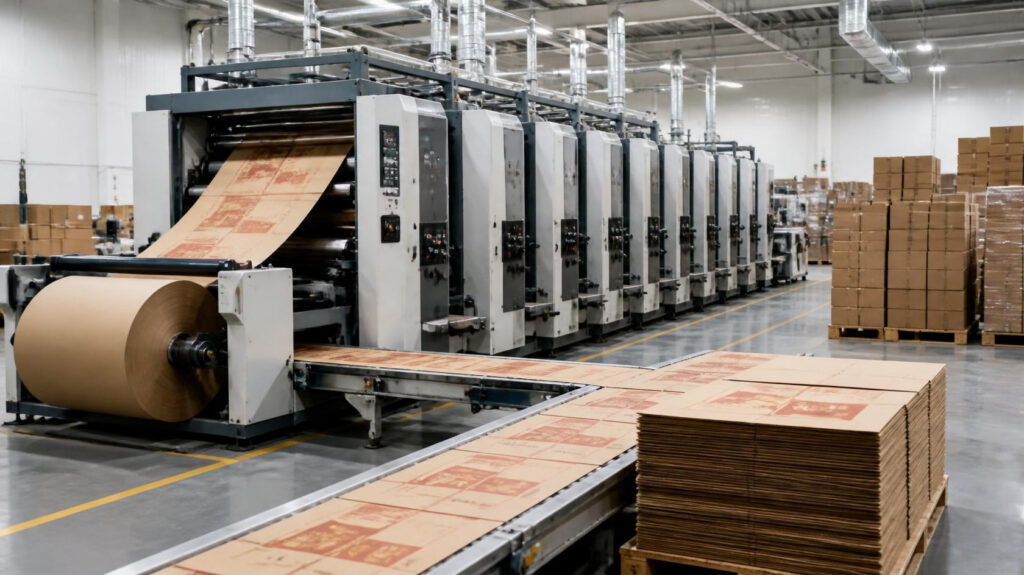
Flexographic printing is commonly used for high-volume corrugated and shipping packaging. It is cost-effective at scale, particularly for simpler graphics and large production runs.
Best for: high-volume corrugated boxes, shipping cartons, simple branding.
Here’s a quick comparison to help you match method to need:
Method | MOQ | Cost per unit | Best quality for | Typical use |
Digital | Low / None | High | Small batches | Prototypes, samples |
Offset | Higher | Low at volume | High-detail color | Retail boxes |
Flexo | High | Lowest at scale | Simple, large runs | Corrugated / shipping |
Not sure which method fits your quantity? Tell us your order size and reorder expectations. We’ll recommend the most cost-effective option before you commit.
From Idea to Production — The Full Workflow
Once the concept is approved, the packaging production process follows a clear sequence. Here is how an AI-generated packaging idea becomes a production-ready package.
Step 1 — Create the packaging concept.
Start with an AI-generated concept, reference image, sketch, or existing brand direction.
Step 2 — Define the packaging specifications.
Confirm the product dimensions, internal L × W × H, box style, material, inserts, and target quantity.
Step 3 — Create the packaging dieline.
Build the flat structure with cut lines, fold lines, glue areas, bleed, and safety margins.
Step 4 — Prepare print-ready artwork.
Set the correct color mode, check image resolution, convert key graphics to vector artwork, and place the design accurately on the dieline.
Step 5 — Create a physical prototype.
Check the packaging dimensions, product fit, structure, artwork placement, and overall appearance before mass production.
Step 6 — Select the printing method.
Choose digital, offset, or flexographic printing based on the packaging material, order quantity, artwork requirements, and budget.
Step 7 — Approve and manufacture.
After the prototype and production artwork are approved, the manufacturer can proceed with the final packaging production run.
The creative concept is only the first step. The following stages turn an AI packaging idea into production-ready artwork that a manufacturer can quote, prototype, and produce.
Frequently Asked Questions About AI Packaging Ideas
Q1: Can a factory print directly from an AI-generated image?
Usually not. An AI-generated packaging image is normally a visual concept rather than production artwork. It may lack accurate dimensions, a dieline, bleed, material specifications, and print-ready color settings. The concept needs to be prepared for production first.
Q2: What is a dieline and do I need to create one myself?
A dieline is the flat blueprint of a package that shows cut lines, fold lines, glue areas, and other structural details. You do not necessarily need to create it yourself. A packaging manufacturer can usually create the dieline based on your box style and specifications.
Q3: Why does my printed color look different from my screen?
Screens display RGB colors using light, while printing commonly uses CMYK inks or spot colors. Some RGB colors cannot be reproduced exactly in print. For important brand colors, a Pantone spot-color reference can provide a more consistent production target.
Q4: What resolution do I need for packaging print?
For raster artwork, 300 DPI at the final print size is a common standard. Logos, text, and other scalable elements should be supplied as vector artwork whenever possible.
Q5: Which printing method is best for a small first order?
Digital printing is often a good choice for prototypes, samples, and short runs because it does not require traditional printing plates. For larger production quantities, offset or flexographic printing may offer a lower unit cost depending on the material and packaging type.
Conclusion
AI makes it faster to explore packaging ideas, but an AI-generated concept is only the starting point. To move from AI packaging ideas to production, you still need accurate dimensions, the right material, print-ready artwork, correct color specifications, a production dieline, and an appropriate printing method.
The goal is not simply to create a better AI render. It is to turn that concept into packaging that can be quoted, prototyped, approved, and manufactured.
Ready to Turn Your AI Packaging Idea Into Production?
Have an AI-generated packaging concept but no production-ready artwork? Packoi can help you turn the concept into manufacturable packaging.
Our team can help with packaging structure, dielines, materials, print-ready artwork, prototyping, and production. Share your concept, product dimensions, and target quantity to get started.