Understanding the concepts of these two aspects is essential for individuals, businesses, and other printing industry stakeholders. With a proper understanding of these issues, companies can achieve the desired outcomes and avoid costly mistakes. It helps users quickly master common paper margins setting skills.
Whether you are a DIY designer struggling with white edges on your business cards, a marketing manager creating a perfect flyer, or a business owner ordering custom packaging, getting the bleed and margin settings right is not optional — it is a requirement.
This guide does not just define these terms; it gives you the exact formulas, software walkthroughs, and a “safe zone” calculator to ensure your print projects looks professional 100% of the time.
What Are Print Bleed and Paper Margins in Printing?
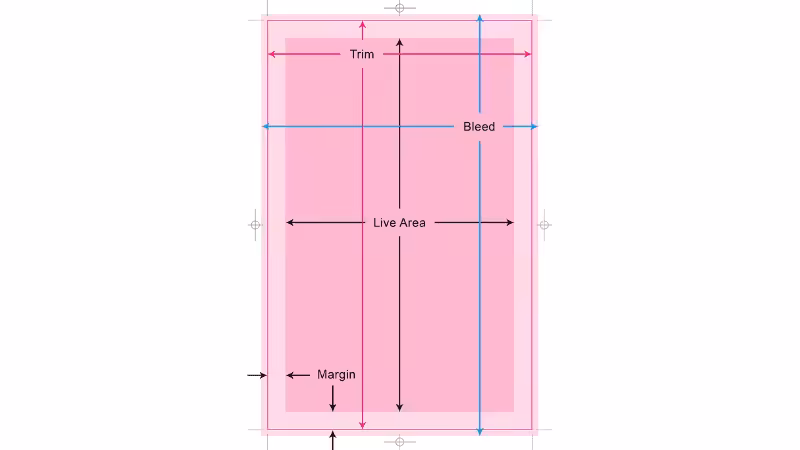
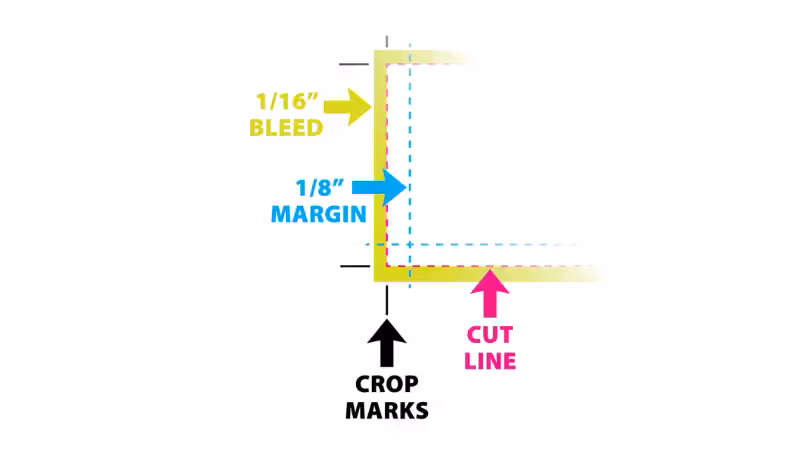
Understanding the importance of bleed and paper margins starts with knowing the definitions in the context of printing. Bleed is the area outside the final trim of a printed document where the design extends beyond the intended finished size.
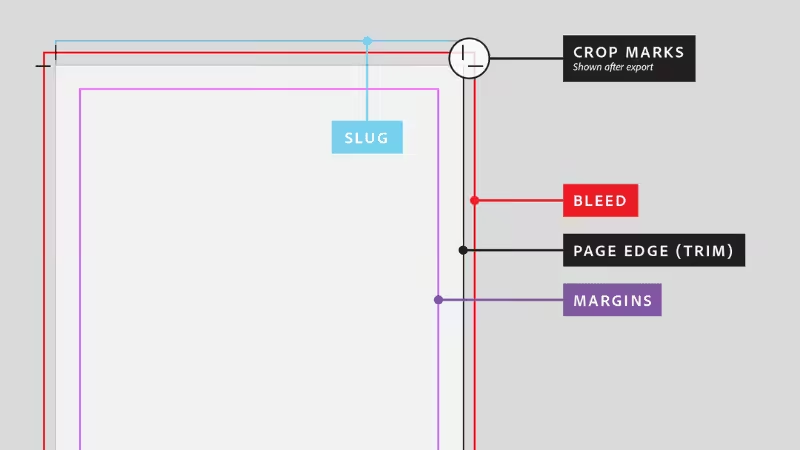
This additional area allows printers to account for minor shifts during trimming, ensuring that no white edges or unfinished elements appear in the final product.
Conversely, the margin is the area between the content and the trim edge of the printed document. It acts as a visual buffer, keeping essential elements like text, images, and logos away from the edges, preventing them from being trimmed or appearing close to the edge.
Perhaps you are wondering why it is important to understand the bleeding area as a business owner or customer. You should consider this issue vital for your business for several reasons. The final document or printed material will meet your desired aesthetics if the margin and bleed settings are right.
There are some core benefits to understanding the bleed area settings and margins. These two aspects are some of the most important elements in making a final design look perfect for your intended use.
Standard Dimensions and the Following Formula
How do you calculate the correct dimensions for a printed piece? Print providers usually require a standard bleed size of 0.125 inches (1/8 inch) on all edges. To find your total canvas size, you use the following formula: add 0.25 inches to both the width and height of your final cut size.
Here is a quick table showing common printed materials and their dimensions:
- Standard Flyer / Letter: A standard 8.5 x 11 inch page size becomes 8.75 x 11.25 inches with bleed.
- Business Cards: A 3.5 x 2 inch card becomes 3.75 x 2.25 inches.
- Postcards and Booklets: A 5 x 7 postcard needs a 5.25 x 7.25 inch design file.
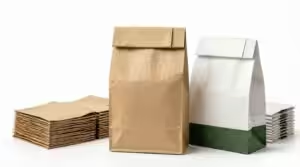
- Packaging: A custom box or cover requires a specialized template, but the 0.125-inch rule usually applies.
Keeping essential text within the safe zone (at least 0.125 to 0.25 inches inside the final trim size) ensures nothing important gets sliced off during production.
How to Prepare Print Files in Software Programs
For beginners who do not have Adobe InDesign, here is a simplified checklist to follow:
- Extend your background image or color beyond the final trim size by 0.125 inches (1/8 inch) on every side.
- Move all text and logos at least 0.25 inches away from the final cut line (this is your “safe zone”).
- Export as a PDF with no compression. If your software does not support bleed (like Microsoft Word), choose a “Print to PDF” option with scaling set to “None.”
Creating a print-ready file can be done in several ways depending on your tools. Here is how to setup your document.
- Adobe InDesign: This is the industry standard. When creating a new document, simply enter 0.125″ in the ‘Bleed’ section. When exporting the PDF format, check the box for “Use Document Bleed Settings” and include crop marks.
- Microsoft Word: Word is not built for professional printing, as it lacks a dedicated bleed feature. To achieve a full bleed here, you must physically enlarge your page size (e.g., changing from 8.5 x 11 to 8.75 x 11.25) and manually adjust your background graphics to stretch all the way to the edge.
The Importance of Bleed and Paper Margins for Printing
As noted earlier, understanding the importance of bleed settings and margins is essential for several reasons. Below are some of the most outstanding advantages.
1. Visual Appeal and Aesthetics
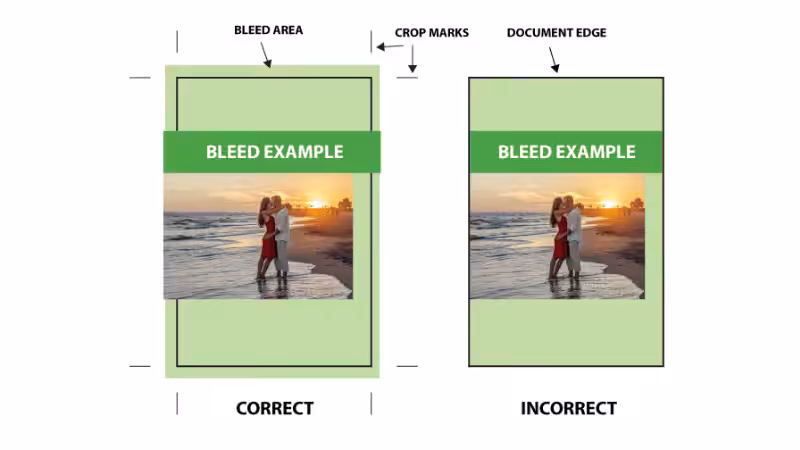
Using the right bleed area and margin settings in print designs creates a visually appealing final document size. With the right background color, a proper bleed area makes artwork and graphics extend seamlessly to the outer edge.
This eliminates any unwanted white borders, gaps, or trim marks. Conversely, the margin provides breathing space, enhancing readability and maintaining a balanced outlook on the final product.
Printers’ Requirements: Printers have specific guidelines and requirements regarding bleed and margin for successful printing. Failing to adhere to these specifications may result in cropped or distorted designs, compromising the overall quality of the printed and eco-friendly packaging materials.
Understanding and knowing how to apply bleed settings allows you to meet printing requirements, avoiding unnecessary reprints.
For example, when designing a business card, you need to get proper crop marks and add bleed to give it perfect visual appeal and aesthetics. The final size of the business card should have proper edge settings and crop marks for excellent results.
2. Professionalism and Attention to Detail
Another reason you need to understand bleed and margin is a professional and detailed outlook in your final work. The margins and bleed settings reflect a commitment to delivering high-quality work that meets industry standards and client expectations. As a general rule, always focus on delivering outstanding documents with proper margins and bleeds.
3. Cost and Time Efficiency
Cost and time efficiency are other benefits of applying bleeds and edges or margins. Focusing on the right settings will create perfect designs and a safe zone on your document, avoiding the need to trim the artwork.
On the other hand, proper margins ensure that essential content remains intact, preventing reprints because the design is close to the edge.
Common Mistakes to Avoid in Print Preparation
Ensuring your design file is flawless requires attention to detail. No matter what the project is, avoiding these errors will save you time and money:
1. Insufficient Bleed Area
Failing to extend your background ink or image into the bleed zone is a critical error. Always ensure the image extendsall the way past the trim line. Otherwise, micro-shifts in the guillotine cutter will reveal ugly white edges.
2. Placing Important Text Outside the Safe Zone
Keep vital details, such as logos, text, and contact info, far from the trim edge. If they are too close, they risk being chopped off in the final print.
3. Unequal or Inconsistent Buffers
Having mismatched internal spacing on different pages makes a booklet or brochure look unprofessional. Maintain consistent visual space (at least 0.25 inches) around your content.
4. Ignoring Binding Requirements
For multi-page documents, the inner gutter must be wider to accommodate the binding completely. If you fail to do this, words will sink into the fold, ruining the reading experience.
Real-World Example: A Business Card Disaster
Imagine you order 500 business cards. You designed your logo so it “feels” right, but you forget to add the 1/8 inch bleed. The printer cuts the card. The result? Your logo is cropped, or worse — a white border appears on one side.
The Fix:
1. Increase your canvas size by 0.25 inches in both width and height.
2. Extend your background to the edge of the new canvas.
3. Keep your contact info inside the 0.25-inch safe zone.
This one extra step turns a wasted $50 into a perfect print job.
Frequently Asked Questions About Bleed and Paper Margins Printing
Q1:What is the standard bleed size for most print projects?
The standard bleed size is 0.125 inches (1/8 inch) in the US and 3mm internationally. Adding this extra border ensures that minor mechanical shifts during the paper cutting process won’t leave unprinted white edges on your final piece.
Q2:Do I need a bleed if my design has a white background?
No, you don’t need a bleed if your design has a completely white background. Since the paper stock is white, any slight cutting shifts won’t be visible at all. However, if any colors, images, or graphics touch the edge, a bleed becomes mandatory.
Q3:How do I export my final design with bleed and crop marks?
When saving your final file as a PDF, you must explicitly enable these print marks. In programs like Adobe InDesign or Illustrator, check the boxes for “Use Document Bleed Settings” and “Crop Marks” in the export menu. This guarantees your printer receives a print-ready file showing exactly where to cut.
Q4:How do bleeds and margins work for custom box packaging?
Packaging uses complex 3D dielines, so artwork must bleed past the cut lines while keeping text safely away from folds and glue flaps. Designing for 3D structures requires highly precise templates. If you need help, our custom packaging experts can verify your artwork to ensure your boxes print flawlessly.
Q5:How do I know if my print file has the correct bleed?
The easiest way is to check your PDF in Adobe Acrobat. Turn on “Show Bleed Box” under the Print Production tools. If your background does not extend past the page edge, you need to re-export your file with a larger bleed zone.
Q6: Why did my printer ask for a “safe zone”?
The safe zone is an internal margin (usually 0.25 inches) where you keep all text and logos. Why? Because even with perfect bleed, the paper does not move perfectly. Moving critical elements away from the edges prevents accidental trimming. If your printer cuts into your text, that is a failure in design setup, not in printing.
Conclusion
Understanding the technical buffer zones is crucial to making your final document size look appealing and professional. Make sure your background graphics exceed the final cut size, and double-check your margin size to protect essential information.
Always communicate with your chosen print provider to request their specific design templates. Getting the format and canvas size correct from the beginning ensures you will receive a flawless final product without the headache of costly reprints.
Get Reliable Design and Printing Solutions Now!
Are you looking for a reliable printer or designer for your products? Please talk with us today or find out more about Packoi Printing‘s services. We are the most reliable printing company that can help your business get the right paper designs and page outlook for your marketing materials.Contact us today to book a demo or learn more about our design services.