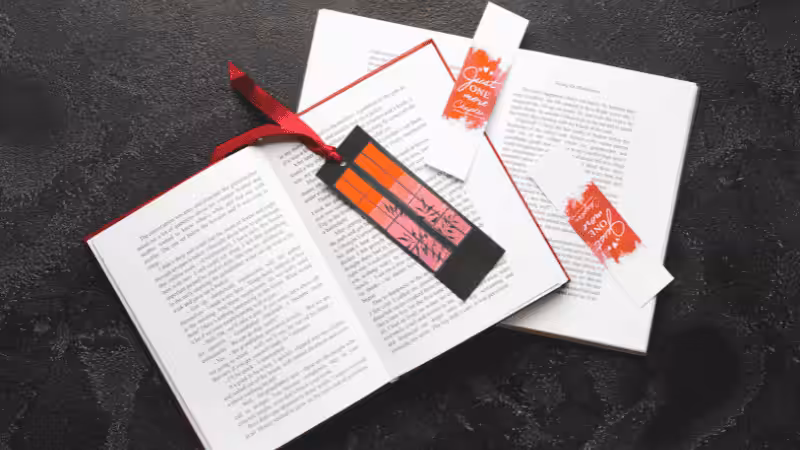
Turn ordinary bookmarks into miniature works of art! Whether you’re an experienced craftsman or a DIY novice, this collection offers a treasure trove of inspiration for everyone.
On these pages, you will find a wide variety of creative designs that are not only easy to make but also very interesting. From elegant watercolor patterns and chic fabric creations to quirky paper crafts and eco-friendly choices, each idea is designed to spark your imagination and add a personal touch to your reading experience.
Exploring the World of Creative DIY Bookmark Ideas
Exploring the world of creative DIY bookmarks is a delightful journey into the realms of crafting and personal expression. Bookmarks, often used as placeholders in books, can also be unique pieces of art, reflecting one’s personality, interests, or artistic skills.
Whether you’re a bibliophile, a craft enthusiast, or someone looking for a personalized gift idea, DIY bookmarks offer endless possibilities for creativity. Here’s a look at these vibrant World Corner homemade bookmarks:
- Materials Galore: The beauty of DIY bookmarks lies in the diverse range of materials you can use. From paper, fabric, and leather to more unconventional items like polymer clay, beads, or recycled materials, each brings a different texture and aesthetic.
- Techniques and Styles: The techniques for creating bookmarks are as varied as the materials. You can paint, sew, knit, crochet, cut, fold, or even weave your way to a beautiful bookmark. Each technique lends itself to different styles, from elegant and sophisticated to fun and quirky.
- Themes and Inspirations: A DIY bookmark can be themed to match personal interests or occasions. Literary themes, nature, abstract art, geometric patterns, and seasonal motifs are just a few examples. They can also be inspired by favorite books or characters, making them even more special for book lovers.
- Sustainability and Upcycling: DIY bookmark ideas also provide an opportunity to upcycle materials like scrap fabric, old jeans, or used paper, aligning with eco-friendly practices.
In summary, the world of creative gifts and DIY bookmarks is not just about creating a functional item, but about crafting a small piece of art—your bookmark—that tells a story, expresses an emotion, or is simply a wonderful gift that brings joy.
Whether you’re a seasoned crafter or just starting, there’s always a great gift bookmark project that can spark your creativity.
Find Your Perfect Bookmark Project: Our Ideas at a Glance
Not sure where to start? Use this quick guide to find the perfect project based on your skill level and goals.
Best for Beginners & Kids
If you’re looking for easy diy bookmark ideas or fun bookmark ideas for kids, start here. Projects like Ribbon & Bead Bookmarks, Comic Strip Bookmarks, and Magnetic Bookmarks require minimal materials and are almost foolproof. They provide a great sense of accomplishment in just a few minutes.
Perfect for a Personalized Gift
Nothing says you care like a handmade gift. If you need a personalized gift idea, try the Photograph Bookmark to cherish a memory, the Embroidered Bookmark with a friend’s initial, or a Pressed Flower Bookmark featuring their favorite bloom.
For Advanced Crafters
Ready for a challenge? If you enjoy working with detail and specific techniques, the Quilled Paper, Leather, and Crochet or Knit bookmark projects will let you showcase your skills and create something truly unique.
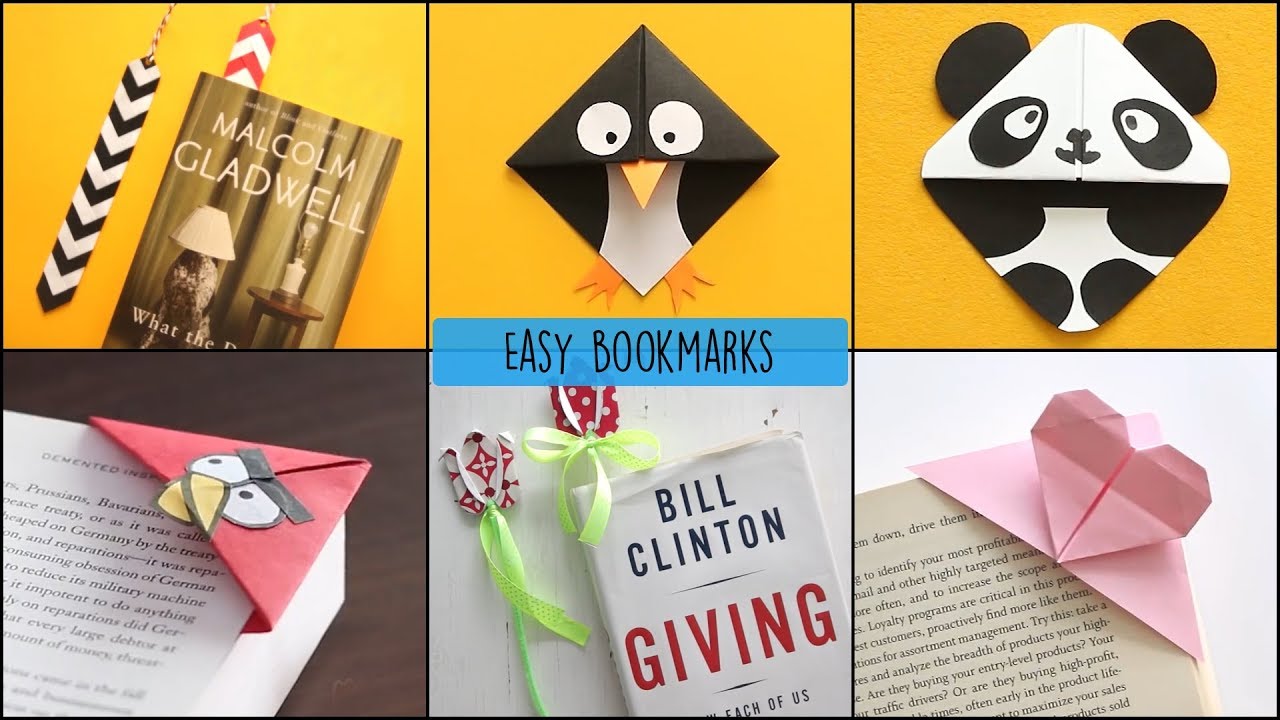
12 DIY Bookmark Ideas for Book Lovers
In addition to custom bookmarks that can be personalized, DIY bookmarks are even more meaningful. We give 12 DIY bookmark ideas, and each one is worth trying. Come and give it a try! Make your bookmark a gift!
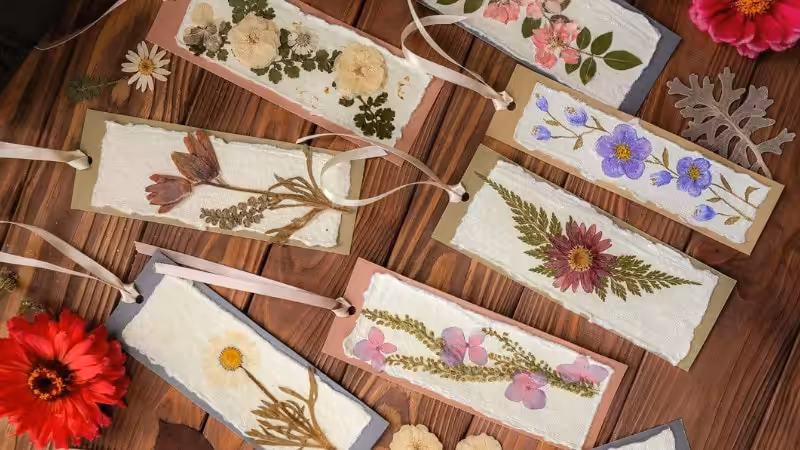
1. Pressed Flower Bookmarks
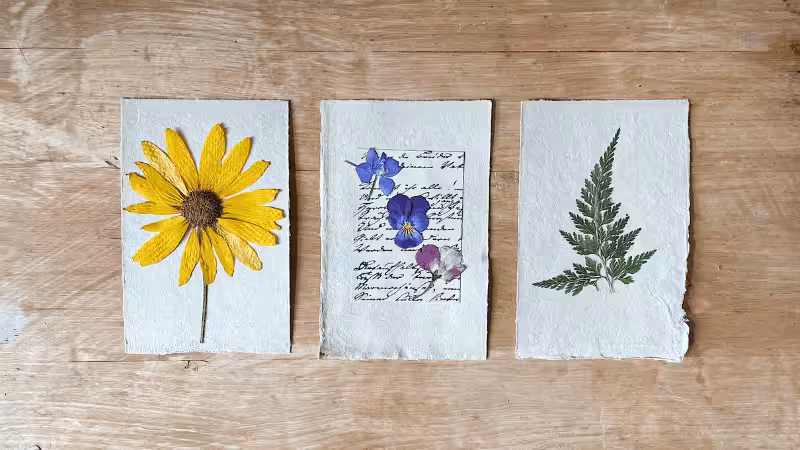
Pressed flower bookmarks bring a bit of the outdoors to your reading routine. They look delicate but hold up well, and everyone turns out different depending on the flowers you use. You can make a few at once and keep them as gifts for friends or as personal keepsakes from a favorite season or garden walk.
Materials Needed
- Fresh flowers and leaves
- Parchment paper and a heavy book
- Cardstock cut to bookmark size
- Craft glue
- Clear adhesive laminate
Instructions
- Pick and dry your flowers for 7 to 10 days using a heavy book or flower press.
- Cut cardstock into bookmark-sized rectangles.
- Arrange pressed flowers on the cardstock as desired.
- Secure them with glue or tape.
- Cover both sides with contact paper or laminate for durability.
- Trim any excess edges for a neat finish.
To preserve the flowers, cover the cardstock arrangement with clear adhesive laminate. Press firmly to remove any air bubbles, giving your bookmark a smooth and polished finish.
2. Watercolor Bookmarks
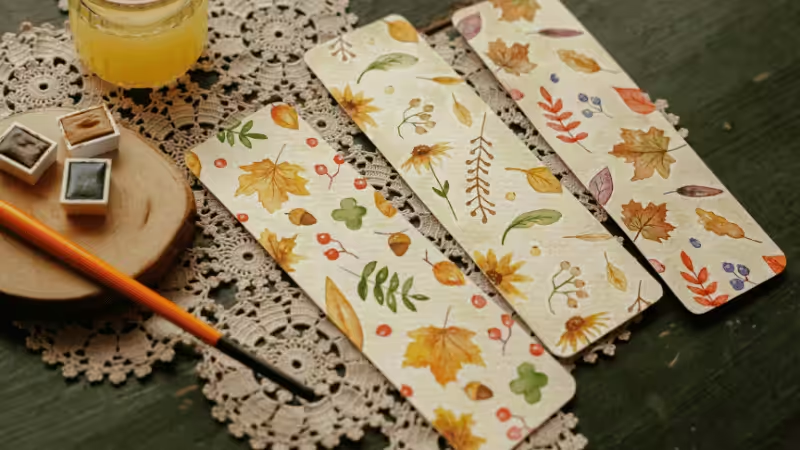
Watercolor bookmarks are bright, simple, and easy to personalize. Each one turns into a small piece of art that reflects your style. The colors blend naturally, creating soft, one-of-a-kind patterns that make reading feel even more relaxing.
Materials Needed
- Watercolor paper cut to size
- Watercolor paints and brushes
- A jar of water
- (Optional) Fine-tip pen for details
Instructions
- Tape the watercolor paper to a flat surface to keep it steady.
- Lightly wet the paper, then add drops of paint and let the colors blend on their own.
- Leave it to dry completely before removing the tape.
- Add small doodles, a quote, or your initials with a fine-tip pen if you want extra detail.
- For a nice finish, punch a hole at the top and tie a ribbon once it’s fully dry.
Create vibrant bookmarks by painting beautiful watercolor designs. Use a mix of colors to make the bookmarks visually appealing. Consider using bold and contrasting colors in free coloring bookmarks for an eye-catching effect.
The key is to balance water and paint for the desired effect. This design requires a basic understanding of watercolor techniques and a steady hand for detailing.
3. Fabric Scrap Bookmarks
Fabric scrap bookmarks bring warmth and texture to your reading time. They’re a great way to reuse leftover fabric while adding a personal touch to your books. You can mix patterns, colors, or textures to match your style.
Materials Needed
- (Optional) Ribbon for a tassel
- Fabric scraps
- Sturdy backing (cardstock or felt)
- Fabric glue or a sewing machine
Instructions
- Cut the fabric and backing to the same size.
- Glue the fabric onto the backing and fold the edges neatly for a clean finish.
- For extra strength, sew a simple border stitch around the edges.
- Add a ribbon tassel at the top if you want a bit of charm and movement.
Using different patterns and colors of fabric scraps allows you to customize each bookmark to match your favorite books or reflect your personality. You could mix and match different fabrics and tassel colors for an eclectic look that stands out in any book.
You can add texture and patterns by sewing or using fabric markers. Attach a piece of felt or thicker fabric as a backing for durability. The main skills involved are cutting accurately and sewing or gluing the fabric neatly.
4. Ribbon and Bead Bookmarks
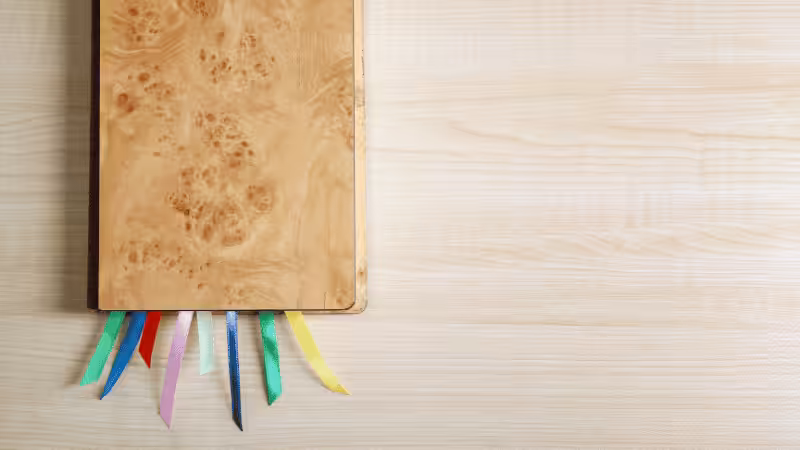
Ribbon and bead bookmarks look delicate yet are easy to make in minutes. They slide between the pages and add a bit of color and charm without taking up space. You can mix bead styles to match your taste, such as sparkly, wooden, or even handmade clay beads, all of which work beautifully.
Materials Used
- A ribbon about 12 to 14 inches long
- One large decorative bead
- A few smaller beads
Instructions
- Slide the large bead onto one end of the ribbon and tie a firm knot so it stays in place.
- Add the smaller beads to the other end and secure them with another tight knot.
- Lay the ribbon inside your book, letting the beaded ends hang outside the pages. The weight of the beads will keep your spot without slipping out.
You can use a variety of beads in different shapes, sizes, and colors to add a unique touch to your bookmarks. The creative aspect lies in choosing bead colors and patterns. The skill required is in threading and securing beads in a way that they stay in place but still slide along the ribbon.
5. Embroidered Bookmarks

Embroidery thread bookmarks offer a wide array of colorful designs. You can create vibrant patterns using different colored threads, adding visual appeal to your bookmarks.
Materials Used
- A small piece of linen, canvas, or sturdy fabric
- Embroidery thread in assorted colors
- Embroidery needle
- Scissors
- Pencil or fabric marker (for sketching the design)
Instructions
- Cut your fabric into a bookmark shape. About 2×6 inches is ideal.
- Lightly sketch your chosen design using a pencil or stencil.
- Thread your needle and start stitching over the outline using simple techniques such as backstitch, satin stitch, or French knot.
- Once your embroidery is complete, trim any loose threads and optionally back the fabric with felt or another fabric layer for a clean finish.
- Press gently with a warm iron (using a cloth on top) to smooth the surface.
This requires embroidery skills and an eye for design to create visually appealing patterns. Use a needle and colorful threads to stitch simple motifs or initials onto fabric bookmarks, adding a personal and textured touch to your reading experience.
6. Quilled Paper Bookmarks
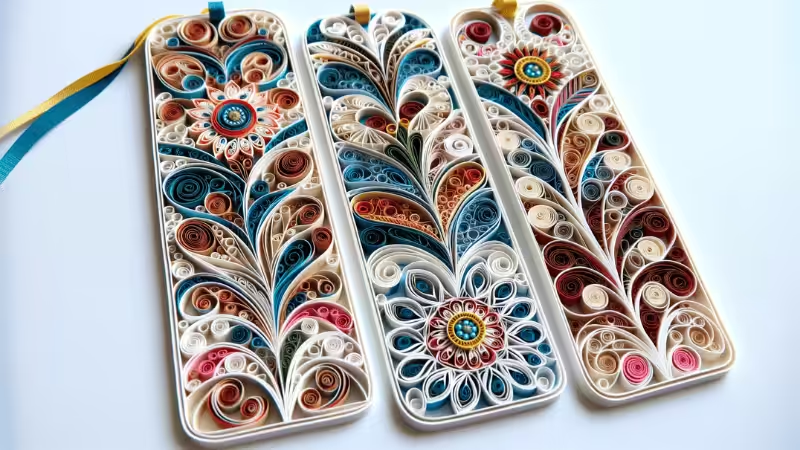
Quilling paper bookmarks offer a wide range of creative designs that are both fun and easy to make. You can create intricate patterns, shapes, and even 3D designs using colorful quilling strips.
Materials Used
- Quilling paper strips in assorted colors
- Quilling tool or toothpick
- Craft glue
- Sturdy cardstock or thick paper (for the base)
- Tweezers (optional, for handling small pieces)
Instructions
- Choose your design; it can be floral, geometric, or abstract.
- Roll the quilling paper strips into coils using a quilling tool or toothpick.
- Shape the coils by pinching or bending them to match your design.
- Arrange the shapes on your cardstock base until you’re happy with the layout.
- Glue each piece in place carefully and allow it to dry completely.
- Once dry, you can laminate or cover the surface with a clear adhesive sheet to protect the design.
This involves rolling narrow strips of colored paper into coils and shaping them into various designs. Glue these shapes onto a sturdy paper base. It demands precision and patience, especially when manipulating small paper pieces.
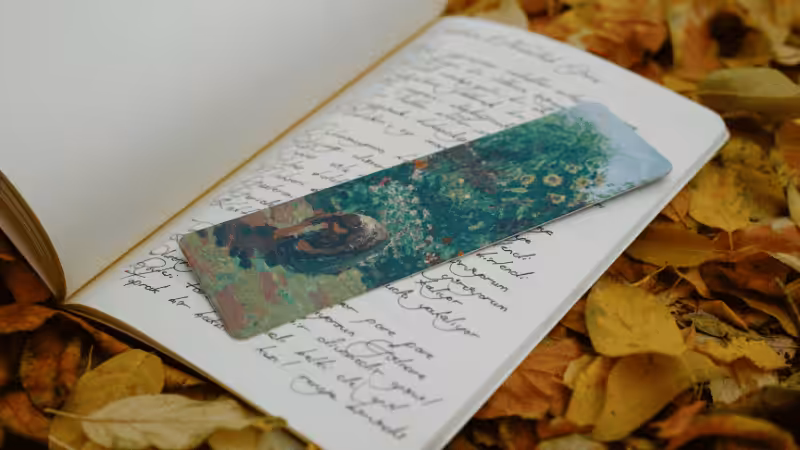
7. Photograph Bookmarks
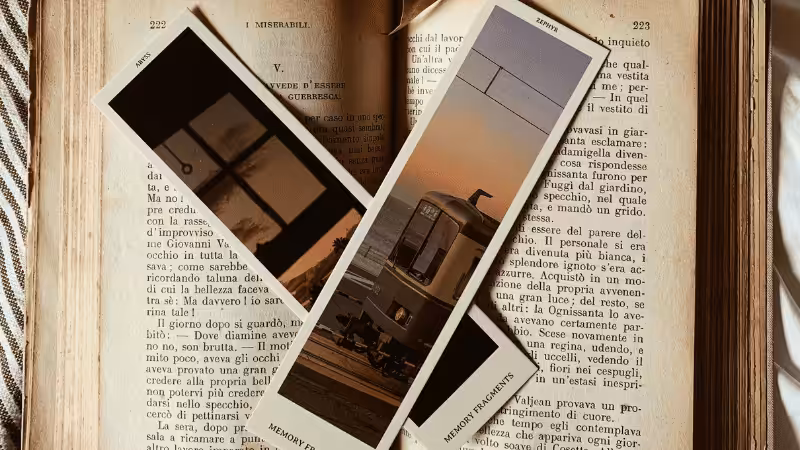
You can use your favorite photos, such as family pictures, kids and pet snapshots, or beautiful scenery shots. Creating personalized photo bookmarks is not only fun but also allows you to cherish special memories every time you open your book.
Materials Used
- Printed photos or digital prints on magnetic paper
- Laminating sheets or a laminator
- Scissors or a paper cutter
- Hole punch (optional)
- Ribbon or tassel (optional for decoration)
Instructions
- Choose your favorite high-resolution photos for clear printing.
- Print them on magnetic or photo paper, ensuring proper alignment and brightness.
- Cut each photo into a bookmark shape, trimming edges neatly and rounding corners for a polished look.
- Laminate the bookmarks to protect them from wear and moisture.
- If desired, punch a hole at the top and thread a ribbon or tassel for a decorative touch.
Print out personal photos on magnetic paper, then laminate them for durability. Cut them into a bookmark shape, rounding the edges for a neat finish. This design is about selecting photos that hold sentimental value and ensuring they are printed in high quality.
8. Leather Bookmarks

Leather bookmarks are a popular choice due to their durability. Unlike paper or fabric, leather is sturdy and long-lasting, making it an ideal material for bookmarks. This means your DIY leather bookmark will withstand regular use without wearing out quickly.
Materials Used
- A strip of genuine or faux leather
- Leather-cutting knife or scissors
- Leather stamps or embossing tools
- Ruler and pencil
Instructions
- Measure and cut a strip of leather to your preferred bookmark size, typically 1.5×6 inches.
- Smooth the edges using fine-grit sandpaper or a burnishing tool for a clean finish.
- Use stamps or embossing tools to imprint designs, initials, or decorative patterns.
- Wipe the surface clean and apply a light leather conditioner to enhance texture and color.
This requires skills in leatherwork, including cutting and embossing, to create a sophisticated and durable bookmark. You can personalize it further by stamping initials, adding decorative stitching, or using natural dyes to give it a unique finish.
9. Origami Bookmarks

You can make bookmarks in the shape of animals, flowers, or even intricate geometric patterns. The possibilities are endless, allowing you to tailor your favorite bookmarks to your interests and preferences. Origami allows for a high level of customization, making it easy to create unique and eye-catching bookmarks that reflect your style.
Materials Used
- Origami paper (6×6 inch sheets or smaller)
- Bone folder or ruler (for crisp folds)
- Glue stick (optional, for securing layers)
- Decorative pens or washi tape (for embellishment)
Instructions
- Select colorful or patterned origami paper.
- Follow your preferred origami pattern, such as a fox, crane, heart, or geometric design.
- If making a corner bookmark, fold the paper into a triangle and tuck the edges inward to form a pocket that fits neatly over a page corner.
- Draw small eyes, outlines, or accents with pens.
- Use a tiny dab of glue if any layers unfold easily.
- Smooth the surface with your ruler or bone folder for a crisp, finished look.
Choose colorful origami paper for the best results. This design requires precision in folding and a good understanding of origami techniques to ensure the bookmark is both functional and decorative.
10. Comic Strip Bookmarks
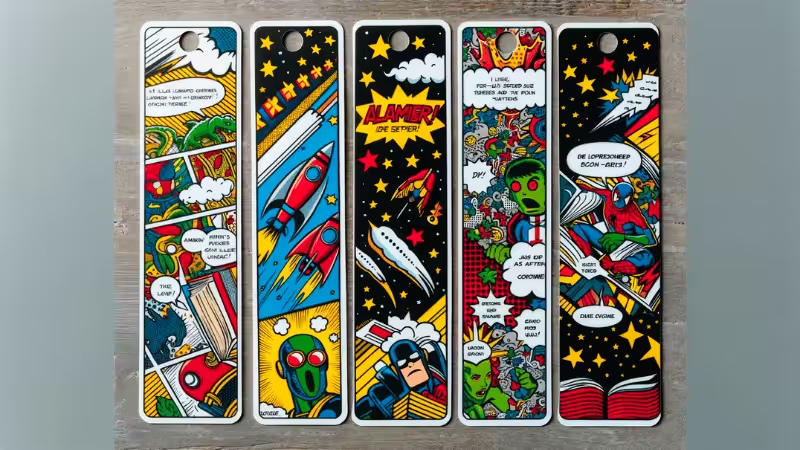
Comic strip bookmarks add an element of fun and interactivity to reading. When using these bookmarks in books or graphic novels, they can serve as visual reminders of the stories within the pages.
Materials Used
- Old comic books, newspaper comics, or printed digital strips
- Scissors or paper cutter
- Laminating sheets or a laminator
- Ruler and pencil (for accurate measuring)
- Hole punch and ribbon or tassel (optional)
Instructions
- Select your favorite comic strips; choose panels that are colorful, funny, or visually engaging.
- Measure and cut the comic strips into bookmark-sized pieces, typically around 2×6 inches.
- Align and place each strip inside a laminating sheet, then laminate for a smooth, durable finish.
- Trim the laminated edges neatly with scissors or a paper cutter.
- Optionally, punch a small hole at the top and add a ribbon or tassel for a polished touch.
Select vibrant comic strips and carefully cut them into strips. This is about choosing strips that tell a story or create a humorous effect, combined with skills in cutting and laminating.
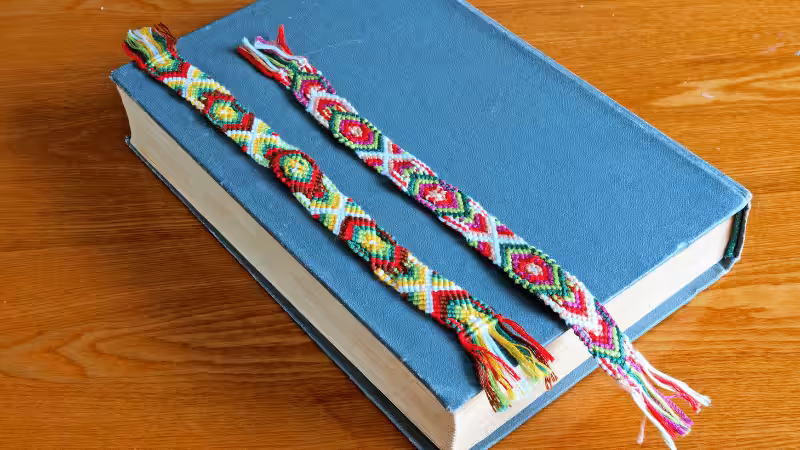
11. Crochet or Knit Bookmarks
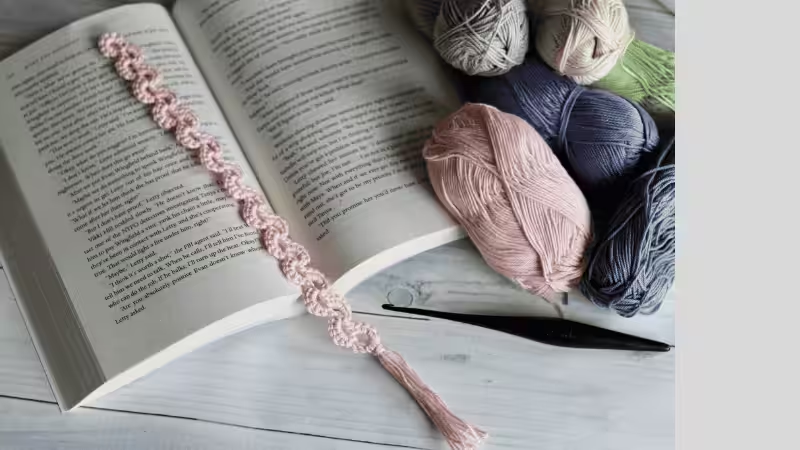
Crocheting or knitting DIY bookmarks allows for endless creativity. You can personalize the design according to your preferences and create unique patterns.
Materials Used
- Thin yarn or crochet thread (cotton works best)
- Crochet hook or knitting needles
- Scissors
- Tapestry needle
- Optional: small beads, tassels, or ribbons for decoration
Instructions
- Choose a lightweight yarn in your preferred color to ensure the bookmark remains slim and flat inside books.
- Using a small crochet hook or knitting needles, start with a foundation chain or cast-on that matches your desired length (typically 6 to 7 inches).
- Crochet or knit simple stitches such as single crochet, half-double crochet, or garter stitch to form a flat rectangular shape.
- Keep the width narrow (around 1 to 1.5 inches) for a sleek bookmark design.
- Once complete, weave in the loose ends using a tapestry needle for a clean finish.
- Optionally, embellish one end with a tassel, bead, or small crocheted motif for extra flair.
This requires knowledge of basic crochet or knitting stitches and the ability to keep the design slim and flat. You can personalize each bookmark with unique patterns or soft textures to give it a cozy, handmade touch.
12. Magnetic Bookmarks
Creating DIY magnetic bookmarks is not only a practical and clever way to keep your place in a book, but it’s also a fun and super-easy craft project. You can make these cute bookmarks using colorful paper, decorative tape, or even repurposing old magnets.
Materials Used
- Decorative paper or cardstock (two identical pieces)
- Small adhesive magnets or magnet strips
- Scissors or craft knife
- Glue or double-sided tape
- Ruler and pencil
- Optional: stickers, washi tape, or markers for decoration
Instructions
- Measure and cut two identical pieces of decorative paper, each about 2×4 inches.
- Fold both pieces in half so they form a small rectangle that can clip over a book page.
- Attach one magnet inside the fold near the bottom edge of one piece and the other magnet on the opposite side, ensuring they align and attract correctly when folded.
- Glue or tape the two folded pieces together securely, leaving the magnets enclosed at the ends.
- Once dry, decorate the outer surface with stickers, washi tape, or doodles to match your personal style.
Decorate as desired. This involves precision in cutting and aligning the magnets to ensure they clasp the pages effectively.
Each DIY cardstock bookmark design offers a unique combination of creative expression and craft technique, from the delicate art of pressed flower pressing to the robust skills of leather working.
Level Up Your Craft: 4 Tips to Make Your Bookmarks Look Professional
If you’ve spent time crafting creative bookmarks, a few finishing touches can elevate them from homemade to professional-grade pieces. Here are some simple tips to give your bookmarks a polished, store-quality look.
Focus on Clean Finishes
Neat edges instantly make a big difference. For paper or magnetic bookmarks, use a paper trimmer instead of scissors to get straight and crisp lines.
If you’re working with leather bookmarks, smooth the edges with fine-grit sandpaper or a burnishing tool. A clean finish gives the bookmark structure.
Add a Protective Layer for Durability
Laminating your bookmarks or adding a clear adhesive film helps them last longer while giving them a sleek sheen. For photo or comic strip bookmarks, this layer prevents fading and wrinkling.
If you’re making embroidered or crocheted bookmarks, spray a light fabric protector to keep them looking fresh and lint-free.
Add a Meaningful Personal Touch
When creating DIY bookmarks, consider incorporating meaningful quotes, images, symbols, and crafts into your designs. For instance, if you’re making a perfect bookmark for a friend who loves adventure, you could include an inspiring travel quote or an image of a globe to personalize the design.
Consider the recipient’s interests, hobbies, and crafts when choosing bookmark ideas for gifts. If they are passionate about music and craft, adding musical notes or instruments as part of the design can make reading the bookmark truly special and unique to them.
Use Embellishments and Finishes
To enhance your bookmarks, explore craft techniques such as adding embellishments like ribbons, buttons, or beads to the corner bookmarks. These small craft additions can add texture and visual interest to any page with your DIY creations.
Experiment with using different colors and finishes to give your homemade bookmarks a more polished look. Applying a coat of varnish or using metallic pens for accents can elevate the overall appearance of your DIY bookmarks.
DIY vs. Professional Printing: Which Is Right for You?
Making your own bookmarks is a fun and rewarding activity, perfect for personal use or creating a few heartfelt gifts. The joy is in the creative process and the uniqueness of each piece.
However, when you need a larger quantity for an event, your business, or as an author, consistency and quality become important. If you need 50, 100, or more identical bookmarks that look sharp and professional, professional printing is the most efficient choice.
When to Go Pro: Business Use Cases for Bookmarks
DIY bookmarks are fantastic for personal use, but what about when you need them for your business? Here are some professional use cases for bookmark printing.
For Authors
For authors, custom-printed bookmarks are a thoughtful and practical way to extend your brand beyond the page. Each bookmark can include your book title, website, and social handles, keeping your name visible every time the reader picks up their book.
They also make excellent giveaways at readings, signings, and literary festivals. Including one with every copy you sell helps reinforce your author identity and encourages repeat engagement from your readers.
For Businesses
Bookmarks are among the most cost-efficient printed materials businesses can invest in. Compact yet impactful, they keep your logo and message in front of customers for weeks or even months. It’s much longer than a typical flyer.
Businesses can distribute them with product purchases, include them in direct mail, or offer them as complimentary items in stores and cafés. Their longevity and utility make them a subtle but powerful form of brand reinforcement.
For Event Marketers
Trade shows, expos, and corporate events are ideal venues for distributing branded bookmarks. They’re easy to transport, inexpensive to produce in bulk, and offer lasting visibility long after the event ends. You can design them to highlight your products, upcoming launches, or contact information.
When paired with strong visuals and premium printing finishes, bookmarks leave a professional impression that stands out among the typical event swag.
Frequently Asked Questions About DIY Bookmark Ideas
Q1: What is the best paper to use for DIY bookmarks?
Cardstock is the best all-around choice for DIY bookmarks due to its thickness and durability. Look for paper weights between 80 lb and 110 lb (or 216-300 gsm) for a sturdy, high-quality feel. For art-specific projects like painting, using watercolor or mixed-media paper is also an excellent option.
Q2: How can I make my homemade bookmarks more durable?
To make your bookmarks last longer, you need to protect their surface from wear and tear. The easiest method is to use self-adhesive laminating sheets, which create a waterproof barrier. Alternatively, you can apply a few coats of a clear acrylic sealant spray or a brush-on sealer like Mod Podge for a protective, non-sticky finish.
Q3: What is a good size for a homemade bookmark?
While there’s no official standard, a common and practical size for bookmarks is around 2 inches wide by 6 inches long (5cm x 15cm). This size is large enough for creative designs but fits comfortably in most paperbacks and hardcovers without damaging the spine. Feel free to adjust the dimensions based on your personal preference or specific design.
Q4:What’s the best way to print bookmarks in bulk?
For a small personal batch, a high-quality home printer can work well. However, if you need a large quantity for a business, event, or to sell, professional printing is the most efficient and cost-effective option. A dedicated printing service ensures consistent color, precise cuts, and gives you access to premium paper stocks and custom finishes that are difficult to achieve at home.
Conclusion
Making your bookmarks is fun. It feels good to make something special and unique. Each bookmark is like a little piece of art that shows off your creativity. You can use paint, drawings, or collages to make them look cool. It’s like making tiny masterpieces that you can use when you read.
Making bookmarks is a fun and relaxing activity that you can do at your own pace. It’s a way to enjoy your free time and express yourself through the designs you create. The difficulty level of making bookmarks can vary, but it doesn’t matter because it’s all about expressing yourself without any limits.
Print Custom Bookmarks for Your Business with Packoi
It’s great to design your bookmarks, but if you need a commercial bookmark, call us! Whether you’re looking to impress clients, spread word-of-mouth, or simply add a dash of professionalism to your business materials, our custom bookmarks are the perfect solution.
With Packoi Printing, you get to choose from a wide range of designs, materials, and finishes, ensuring that your bookmark perfectly aligns with your brand’s aesthetic and message. From sleek and minimalist to vibrant and eye-catching, create bookmarks that not only mark pages but also leave a lasting impression on your business.
Get in touch with Packoi Printing today and start designing bookmarks that are as unique as your business.”